Grove Single Axis Analog Gyro
Last updated
Was this helpful?
Last updated
Was this helpful?
The Grove – Signal Axis Analog Gyro is based on an angular velocity sensor (Murata-ENC-03R) that uses the phenomenon of Coriolis force. It can only measure the X-axis angular velocity, which is different from other 3-Axis gyro, but with a higher speed. It can be used for the position control and attitude control like the self-balanced 2WD.
Model:
Input Voltage: 3.3V/5V
Standard Grove Interface
Light Weight
High Speed
Measure X-axis Angular Velocity
The module detects one-axis rotation with analog signal. High-pass filter and low-pass filter circuit are applied to reduce the temperature drift and suppress the output noise. Before the measurement of the angular velocity, a reference value(the sensor output at Angular Velocity=0) is required. This value is 1.35V in default. But in order to get more accurate reference values, before the measurement,a calibration is necessary. In this calibration, the output voltage when angular velocity =0 been sampled 200 times, and then the average of these data will be treated as the reference value.
2.Plug the Grove - Base Shield into Arduino/Seeeduino and connect them to PC using a USB cable.
`
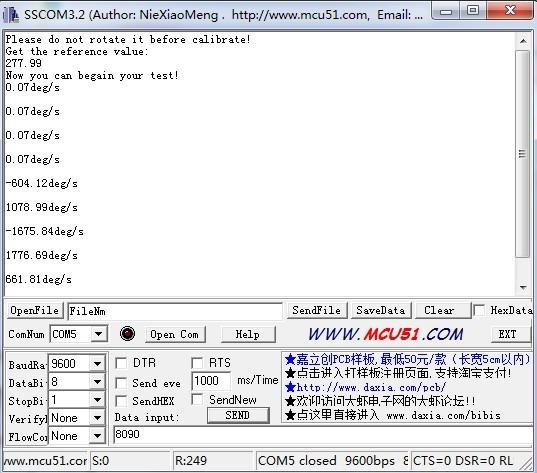
4.Now, it is time to the calibration.Put the sensor on your desk horizontally, and then press the Reset button on the Seeeduino, and then Open the serial tool:
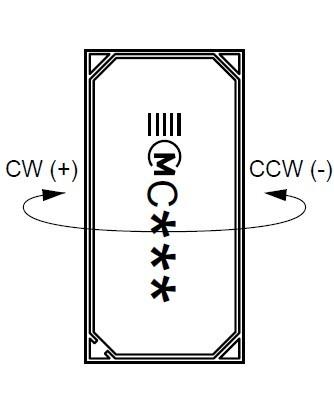
5.As you see the "Now you can begin your test", that means the calibration done. You can use the sensor now. Rotating direction can reference the following picture:
1.You should have got a raspberry pi and a grovepi or grovepi+.
3.Connection
Plug the sensor to grovepi socket A0 by using a grove cable.
4.Navigate to the demos' directory:
cd yourpath/GrovePi/Software/Python/
To see the code
nano grovesingleaxisanaloggyro.py # "Ctrl+x" to exit #
5.Run the demo.
sudo python grovesingleaxisanaloggyro.py
1.Connect it to A0 port of , of cause any pin of the analog pins would be OK.
3.Upload the below code.Please click if you do not know how to upload.
2.You should have completed configuring the development enviroment, otherwise follow .
[Eagle]
[PDF]
[PDF]
[Datasheet]
[Code]