Grove Inventor Kit for microbit
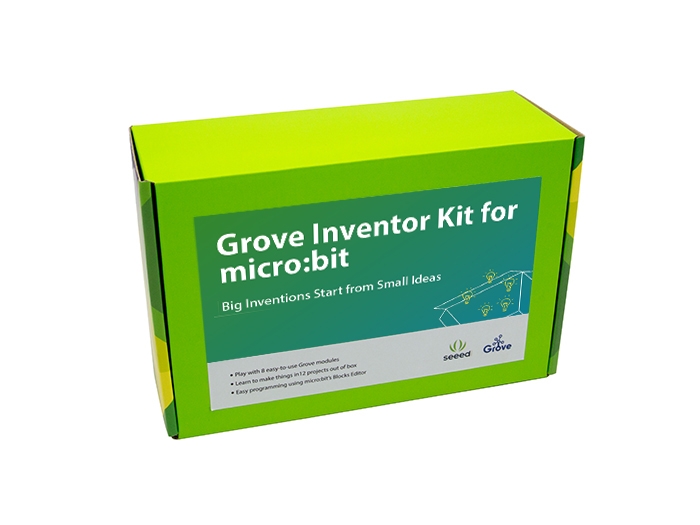
The BBC micro:bit is a pocket-sized computer that can easily realize your creativity without much electrical and coding knowledge. There are numerous possibility of creation you can dig out by micro:bit, from robots to musical instruments. However if you want to create more things, just 1 micro:bit is barely not enough, That’s why we introduce the Grove Inventor Kit for micro:bit to you.
The Grove Inventor Kit for Micro:bit brings endless possibilities to your micro:bit. The core board in this kit is the Grove shield for micro:bit, with which you can use plenty of Grove modules including sensors, display, actuator to interact with micro:bit. If you never used and have no idea what grove is, here is the introduction of Grove. All you need to know is that with Grove, there is no need of soldering or jump wires any more. Your prototyping will be easier and much more convenient.
We have already prepared 8 grove modules to let you get started with micro:bit. With these grove modules, you can measure distance and display it, use gesture to play different music, or make a smart guard for your desk or room. We have prepared all the necessary libraries(packages) for free download. If you are a beginner to micro:bit, don’t worry because we have also prepare 12 different project which can teach you step by step. If you are an advanced user, this kit will help you more creative project than others.
!!!note
The output voltage of micro:bit is around 3.0V, use microbit or AA battery to power the circuit may cause malfunction of Grove modules which requires high input voltage and drive current(e.g Grove - Ultrasonic Ranger). In order to make these kind of Grove function well, please use the micro-USB port on Grove shield for microbit to power the circuit.
Features
Cool extension shield with rich and convenient peripherals;
10 well selected Grove modules for working with micro:bit;
12 awesome projects to let you get started quickly;
Well documented instruction.
Hardware Overview
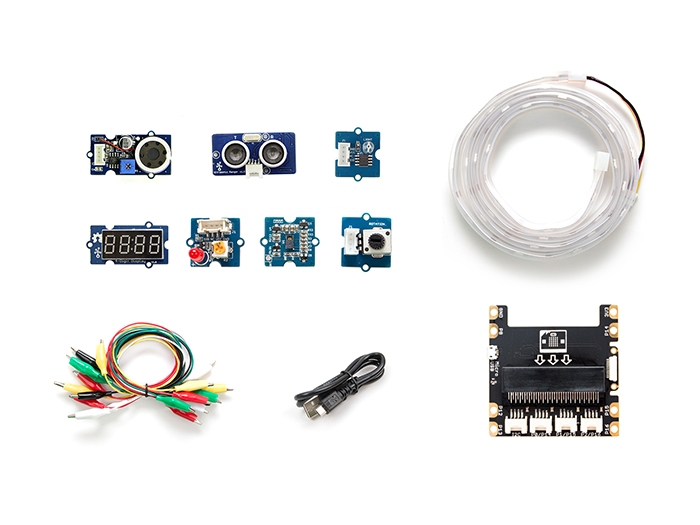
Parts list
Part name
Quantity
Grove Shield for micro:bit
1
Grove - Rotary Angle Sensor(P)
1
Grove - Speaker
1
Grove - Ultrasonic Ranger
1
Grove - Light Sensor v1.2
1
Grove - WS2812 Waterproof LED Strip - 30 LEDs 1 meter
1
Grove - Gesture
1
Grove - 4-Digit Display
1
Grove - Red LED
1
Micro USB Cable - 48cm
1
12 Projects Manual
1
Alligator Cable
10
Grove Cable
7
Getting Started
Fundamentals with Micro:bit
You need to know some essential knowledge if it is the first time that you get involved with Micro:bit. You can click here to see more about Micro:bit.
Micro:bit offers two type of editor - JavaScript Block Editor and Python Editor. JavaScript Block Editor support graphical programming, it's easy to learn. So this Tutorial is based on JavaScript Block Editor.
Here are two simple steps before you enjoy our kit, after that we can start program.
Step1.Open the Editor
Please click to open the JavaScript Block Editor , and you will see a graphical programming web.
Step2.Add Grove Package
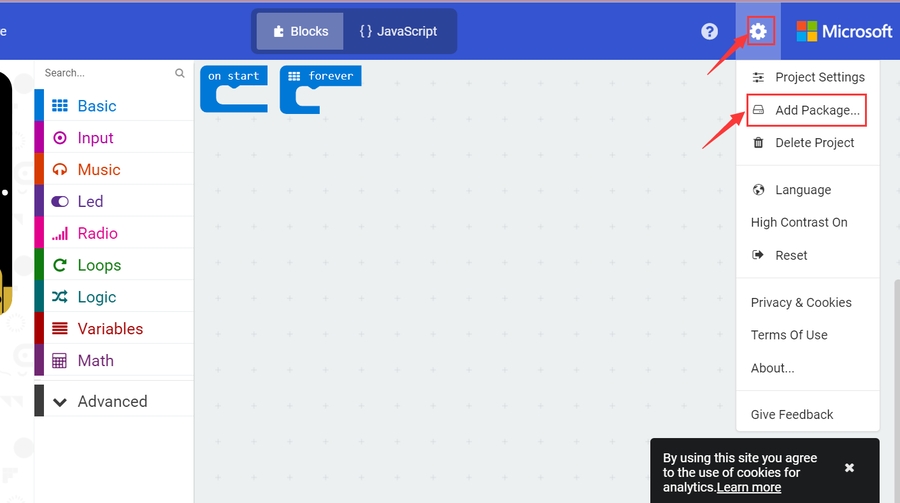
Click the gear in the top right corner > select Add Package
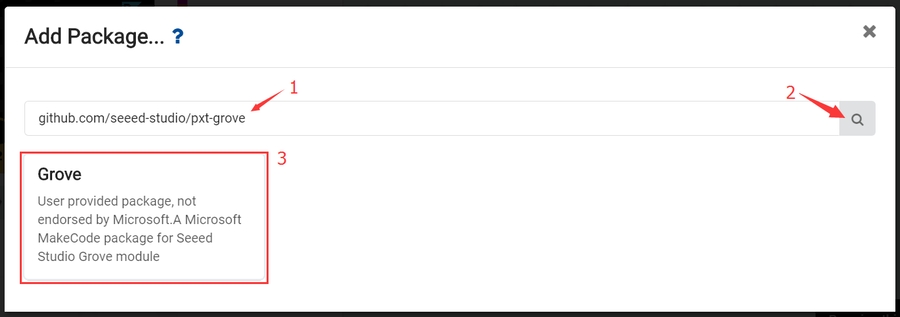
Enter project URL: github.com/seeed-studio/pxt-grove
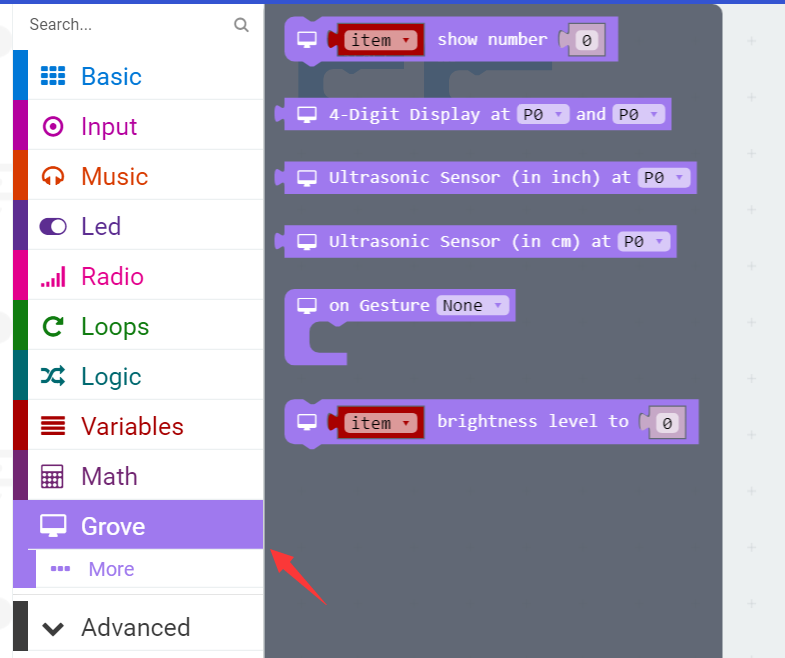
Now you can find Grove in the toolbar.
Demo 1. Gesture Recognition
The gesture sensor can recognize 9 different gestures, in this demo, you will learn how to display the recognized gesture name on micro:bit.
Part list
Part name
number
Grove - Gesture
1
Grove Shield for micro:bit
1
micro:bit
1
Grove Universal 4 pin cable
1
Micro-USB cable
1
Connection
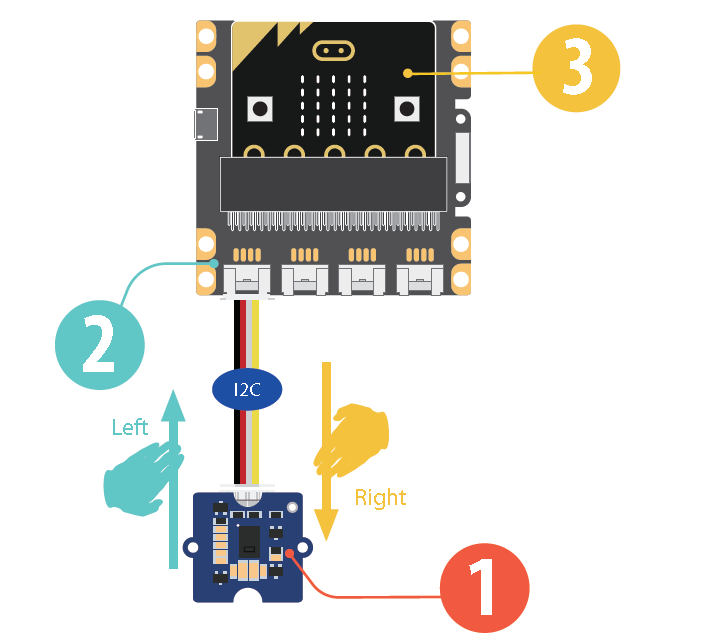
Plug the micro:bit into Grove Shield for micro:bit.
Connect the Grove-Gesture to I2C Port of micro:bit via a Grove Universal 4 pin cable.
Connect micro:bit to PC via a Micro-USB cable.
!!!warning
Software
Step1:
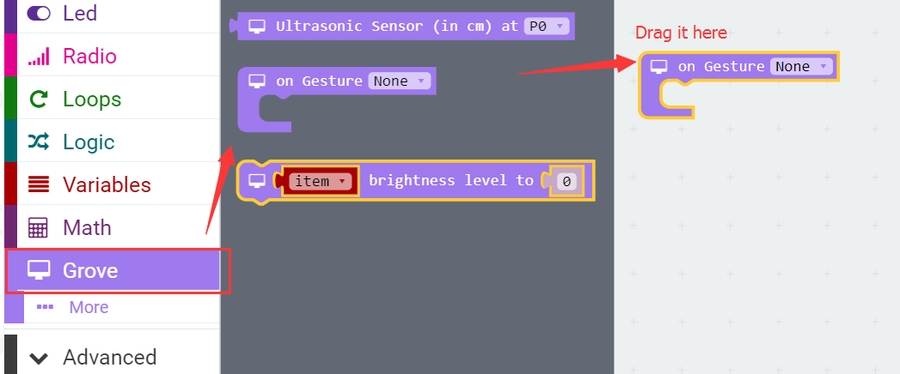
Add On Gesture Block
Step2:
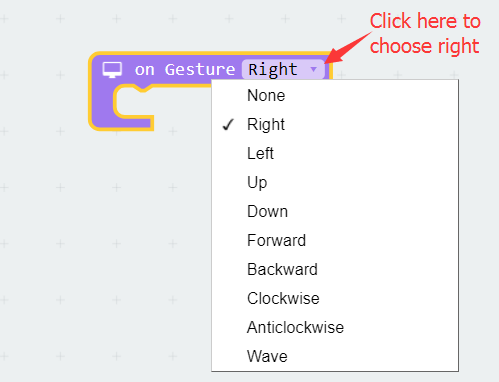
Select Right, so that the sensor can recognize when you move your hand from right to the left.
Step3:
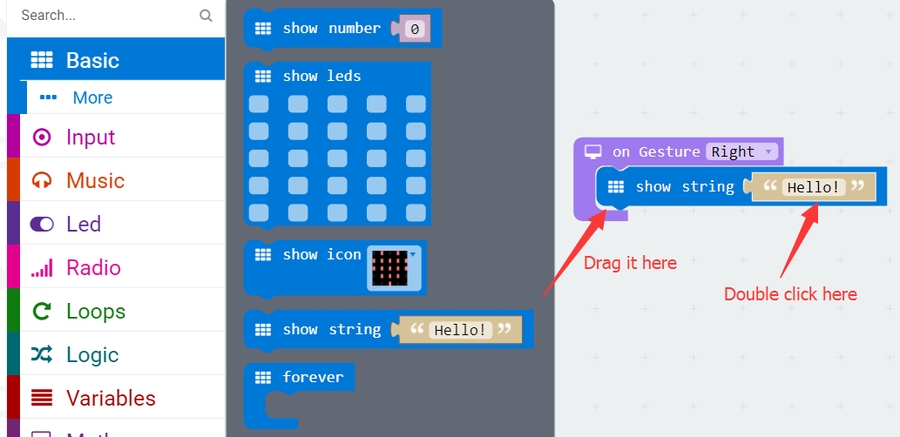
Add Basic block show string and embed it into the Gesture block.Then double click "Hello!", change it to "Right".
Step4:
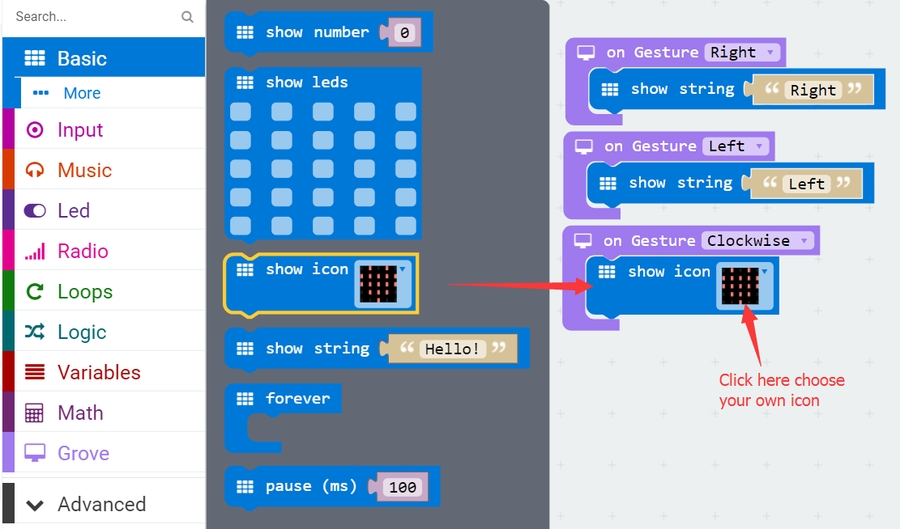
Add "Left" and "Clockwise" the same way, and embed show icon into "Clockwise".
Step5:
When you finish all this above, rename the project "gesture". Then you can download the project to your board. Click Download in the Bottom left corner, download the file microbit-gesture.hex into the flash of MICROBIT.
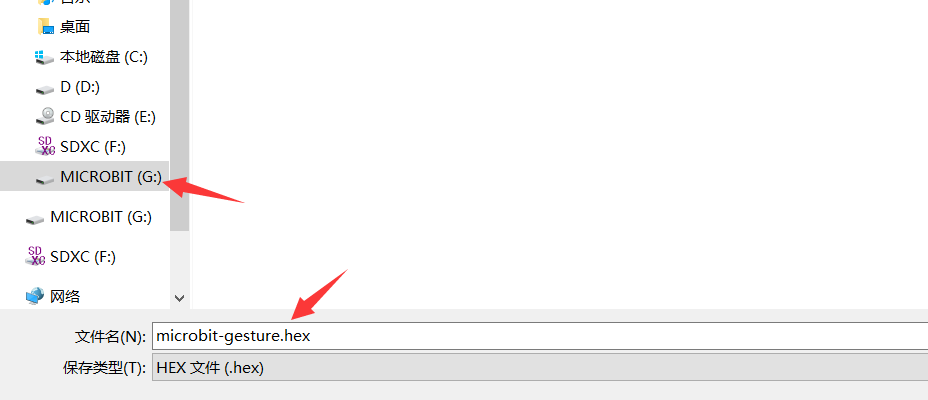
Now enjoy your project.
!!!tip
You can find the blocks by color. For example, if you don't where show icon is ,since it's blue and the Module Basic is blue,you can find it here. Simple and effective, isn't it?
Demo 2. Ultrasonic Meter
In this demo, you will learn how to use the ultrasonic sensor to measure distance and show the value on a display.
Part list
Part name
number
Grove - Ultrasonic Ranger
1
Grove - 4-Digit Display
1
Grove Shield for micro:bit
1
micro:bit
1
Grove Universal 4 pin cable
2
Micro-USB cable
1
Connection
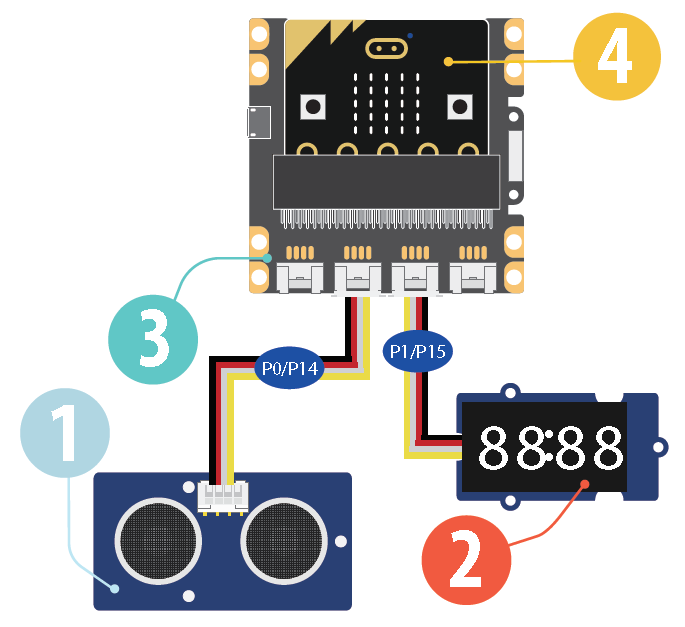
Plug the micro:bit into Grove Shield for micro:bit.
!!!warning please make sure the LED Array is faced up when you plug the micro:bit, or you may damage the board.
Connect the Grove-Ultrasonic Ranger to P0/P14 Port of micro:bit via a Grove Universal 4 pin cable.
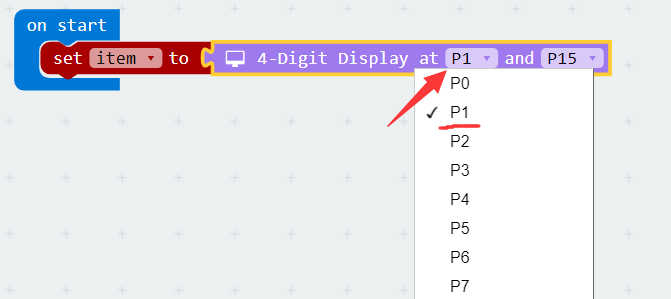
Connect the Grove-4-Digit Display to P1/P15 Port of micro:bit via a Grove Universal 4 pin cable.
Connect micro:bit to PC via a Micro-USB cable.
software
Step1:
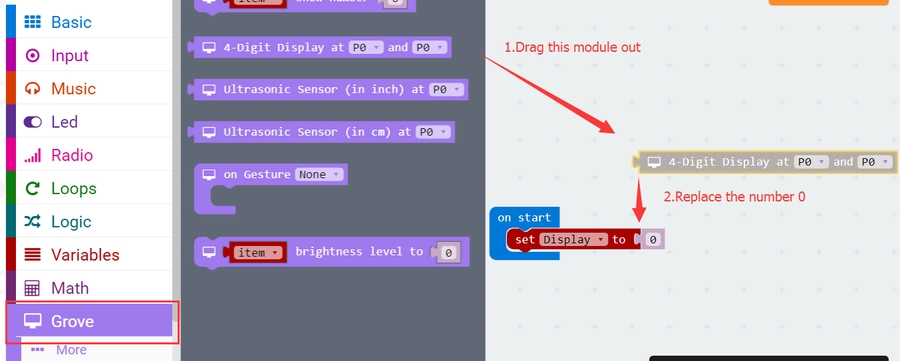
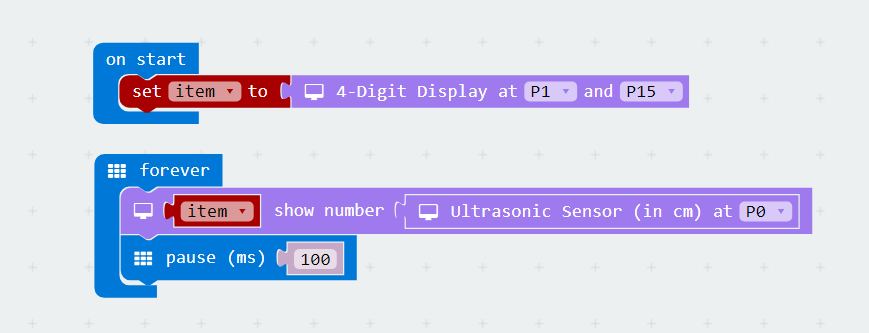
Add basic block on start, then add variable blocks set item to 0, rename ‘items’ to ‘Display’. If you have successfully added the Grove package, replace “0”with Grove block 4-Digit Display at P1 and P15.
Step2:
Add basic block forever, then add Grove block item show number 0, rename ‘item’ to ‘Display’, replace ‘0’ with Grove block Ultrasonic Sensor (in cm) at P0.
Step3:
Add basic block pause (ms) (100).
Step4:
Rename the project "Ultrasonic Meter", download and enjoy.
Resources
Grove Inventor Kit for micro:bit User Manual
Last updated