Learn, Make and Invent
  • Educational STEM Products
  • Early Primary
    • Bee Bot
    • Ozobot
    • Matatalab Coding Set
    • Neuron coding blocks
    • Osmo ios
    • Cubetto
    • Sphero Bolt
  • Primary
    • Codey Rocky AI Robot
      • Tutorials
        • Introduction
        • Get Started
        • Upload Mode
        • Emotion Blocks
        • IoT Blocks
        • Neuron Blocks
        • IR Remote
        • Use Python
      • Examples
      • Block Reference
        • Looks
        • Lighting
        • Speaker
        • Action
        • Sensing
        • Infrared
        • Events
        • Control
        • Operators
      • Python API Reference
        • Python API for Codey
        • Python API for Rocky
        • Python API for Third-Party Libraries
        • Python API for Neuron Extension Modules
      • FAQs
    • Edison
    • mBot
      • Introduction
      • Building mBot
      • Connect mBot
      • Preset Modes
    • Microbit
    • Merge Cube
    • Bare Conductive Board
    • Tello Edu
  • Secondary
    • Microbit Grove Inventor Kit
    • mBot Ranger
    • Arduino Science Kit
    • Arduino Starter Kit
    • Arduino Grove Starter Kit
    • CoDrone
  • Senior Secondary
    • CoDrone Pro
    • Arduino CTC Go
  • Digital Tech Kits
    • Digital Tech Kit for K-2
    • Digital Tech Kit for 3-5
    • Digital Tech Kit for 6-8
    • Digital Tech Kit for 9-10
  • Makerspace
    • Otto DIY
      • User guide
      • Assembly Instructions
        • Builder Kit
        • Builder Kit +
        • Builder Kit Humanoid
        • Builder Kit E
      • OTTO enclosures 3D and laser cut files
      • Code
    • Curcuitmess
      • Circuitmess Ringo
        • Inside the Box
        • Tools Needed
        • Soldering the parts
        • Assembling the parts
        • Set up your Ringo
  • Grove Ecosystem
    • Grove System
    • Grove Modules
      • Actuators
        • Atom Node
        • Grove 2 Coil Latching Relay
        • Grove Button
        • Grove Buzzer
        • Grove Dry Reed Relay
        • Grove EL Driver
        • Grove Haptic Motor
        • Grove I2C Motor Driver V1.2
        • Grove I2C Motor Driver V1.3
        • Grove I2C Motor Driver
        • Grove LED Matrix Driver v1.0
        • Grove Mini Fan
        • Grove Mini I2C Motor Driver v1.0
        • Grove MP3 v2.0
        • Grove Recorder v3.0
        • Grove Relay
        • Grove Serial MP3 Player
        • Grove Servo
        • Grove Solid State Relay
        • Grove Speaker
        • Grove Variable Color LED
        • Grove Vibration Motor
        • Grove Water Atomization
      • Display
        • Grove 4 Digit Display
        • Grove Circular LED
        • Grove LCD RGB Backlight
        • Grove LED Bar
        • Grove LED Socket Kit
        • Grove LED String Light
        • Grove LED Strip Driver
        • Grove OLED Display 0.96inch
        • Grove OLED Display 1.12inch
        • Grove Red LED
        • I2C LCD
      • Sensors
        • Grove 3 Axis Analog Accelerometer
        • Grove 3 Axis Compass V1.0
        • Grove 3 Axis Digital Accelerometer 1.5g
        • Grove 3 Axis Digital Accelerometer 16g
        • Grove 3 Axis Digital Accelerometer 400g
        • Grove 3 Axis Digital Gyro
        • Grove 6 Axis Accelerometer And Compass V2.0
        • Grove 6 Axis Accelerometer And Gyroscope
        • Grove 80cm Infrared Proximity Sensor
        • Grove Air Quality Sensor v1.3
        • Grove Alcohol Sensor
        • Grove Barometer Sensor BME280
        • Grove Barometer Sensor BMP180
        • Grove Barometer Sensor BMP280
        • Grove Barometer Sensor
        • Grove Barometer High Accuracy
        • Grove Chest Strap Heart Rate Sensor
        • Grove CO2 Sensor
        • Grove Collision Sensor
        • Grove Digital Infrared Temperature Sensor
        • Grove Digital Light Sensor
        • Grove Dust Sensor
        • Grove Ear clip Heart Rate Sensor
        • Grove Electricity Sensor
        • Grove Finger clip Heart Rate Sensor with shell
        • Grove Finger clip Heart Rate Sensor
        • Grove Fingerprint Sensor
        • Grove Gas Sensor O2
        • Grove Gas Sensor
        • Grove HCHO Sensor
        • Grove High Temperature Sensor
        • Grove IMU 10DOF v2.0
        • Grove Infrared Receiver
        • Grove Line Finder
        • Grove Temperature and Humidity Sensor Pro
        • Grove Temperature And Humidity Sensor
        • Grove Voltage Divider
        • Grove Water Sensor
        • Grove XBee Carrier
      • Communication
        • Grove High Precision RTC
        • Grove LoRa Radio
        • Grove NFC Tag
        • Grove NFC
        • Grove 125KHz RFID Reader
        • Grove 315MHz RF Kit
        • Grove 433MHz Simple RF Link Kit
        • Grove Bee Socket
        • Grove BLE v1
        • Grove BLE dual model v1.0
        • Grove DMX512
        • Grove GPS
        • Grove I2C ADC
        • Grove I2C FM Receiver
        • Grove Protoshield
        • Grove RJ45 Adapter
        • Grove Screw Terminal
        • Grove Serial Bluetooth v3.0
        • Grove Serial RF Pro
        • Grove UART Wifi
      • Others
        • Grove Base Booster Pack
        • Grove Base Cape for BeagleBone v2
        • Grove Base HAT
        • Grove Base Shield for NodeMCU V1.0
        • Grove Base Shield for Photon
        • Grove Breakout for LinkIt Smart 7688 Duo
        • Grove Cape for BeagleBone Series
        • Grove Indoor Environment Kit for Edison
        • Grove Inventor Kit for microbit
        • Grove IoT Developer Kit Microsoft Azure Edition
        • Grove IoT Starter Kits Powered by AWS
        • Grove Recorder
        • Grove Shield for Intel Joule
        • Grove Smart Plant Care Kit
        • Grove Speech Recognizer Kit for Arduino
        • Grove Starter Kit for BeagleBone Green
        • Grove Starter Kit for IoT based on Raspberry Pi
        • Grove Starter kit for LinkIt Smart7688 Duo
        • Grove Starter Kit v3
        • Grove AND
        • Grove Base Shield for IOIO OTG
        • Grove BlinkM
        • Grove DC Jack Power
        • Grove Differential Amplifier v1.0
        • Grove Differential Amplifier v1.2
        • Grove GSR Sensor
        • Grove I2C Hub
        • Grove Joint v2.0
        • Grove Mega Shield
        • Grove Mini Camera
        • Grove Mixer Pack V2
        • Grove MOSFET
        • Grove Node
        • Grove NOT
        • Grove NunChuck
        • Grove OR
        • Grove PS 2 Adapter
        • Grove Recorder v2.0
        • Grove Serial Bluetooth
        • Grove Serial LCD V1.0
        • Grove Single Axis Analog Gyro
        • Grove SPDT Relay 30A
        • Grove Starter Kit for LinkIt ONE
        • Grove Starter Kit for mbed
        • Grove Toy Kit
        • Grove Wrapper
        • GrovePi Plus
  • Arduino
    • Graphical coding with Grove sensors
    • Arduino Comparison Sheet
    • Tutorials
      • Setup Arduino Every board in Arduino IDE
      • Arduino Cloud
      • Installing Libraries
      • Motor, Servo for Arduino
      • Sensor for Arduino
    • Examples
      • Genuino 101
        • Prerequisites
        • Shock / Tap Detection
        • LED Control Over Bluetooth
        • Board Orientation Detection
        • Pedometer – Step Counting Over Bluetooth
        • Timer Switch
        • Appendices
          • Appendix A
          • Appendix B
  • micro:bit
    • Examples
      • Servo with micro:bit
  • Halocode
    • Introduction
    • Get Started
    • Upload Mode
    • Speech Recognition
    • User Cloud Message
    • Use Python with HaloCode
    • Code with Mu A Simple Python Editor
      • Examples
        • Basic Project
          • Color Mixer
          • Compare Strength
          • Connect Wi-Fi
          • Control Multiple HaloCodes via LAN
          • Energy Ring
          • Make a Smiling Face with the LED Ring
          • Make a Volume Detector
          • Press the Button to play LED Animation Meteor
          • Rainbow Button
        • Level Up
          • Control HaloCode's LEDs via Voice Command
          • Remote Control
          • Make HaloCode the Steering Wheel of the Car on Stage
          • HaloCode's Remote Control Deck
          • Emotion Detector
          • Deep Learning and Facial Recognition
          • Use Global Variable to Interact with Sprites
        • Workshop
          • A Kitten with Blinking Eyes and a Waving Tail
          • Pedometer
          • Smart Home
  • Troubleshooting
    • Matatalab
      • Matatalab Upgrade
        • Pre Upgrade Instructions - MatataBot
        • MatataBot Upgrade
        • Matata Tower Upgrade
        • Resources for Upgrade
      • Matatalab Pairing
Powered by GitBook
On this page
  • Using the Library Manager
  • Importing a .zip Library
  • Manual installation

Was this helpful?

  1. Arduino
  2. Tutorials

Installing Libraries

How to install libraries in Arduino IDE

PreviousArduino CloudNextMotor, Servo for Arduino

Last updated 5 years ago

Was this helpful?

Using the Library Manager

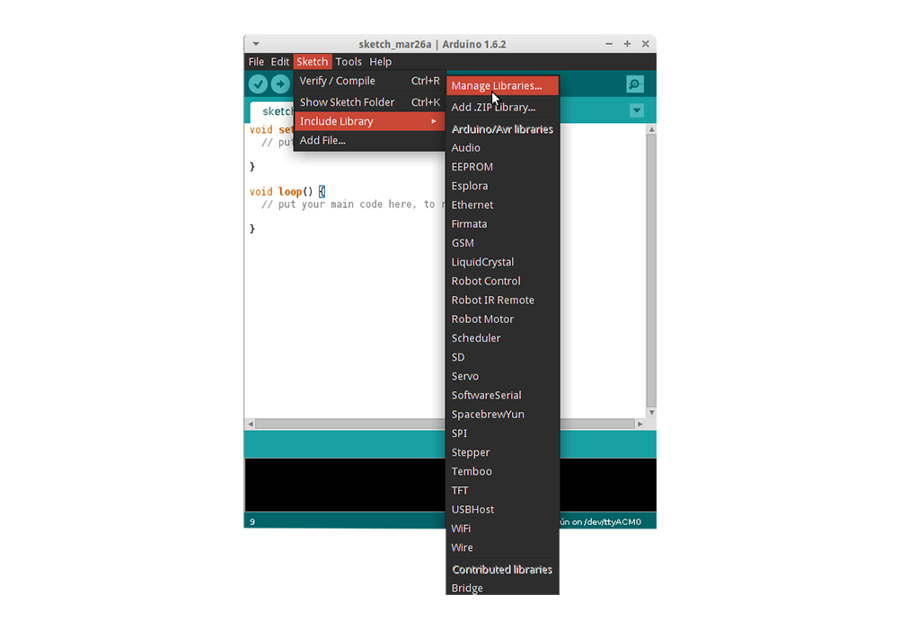
To install a new library into your Arduino IDE you can use the Library Manager (available from IDE version 1.6.2). Open the IDE and click to the “Sketch” menu and then Include Library > Manage Libraries.
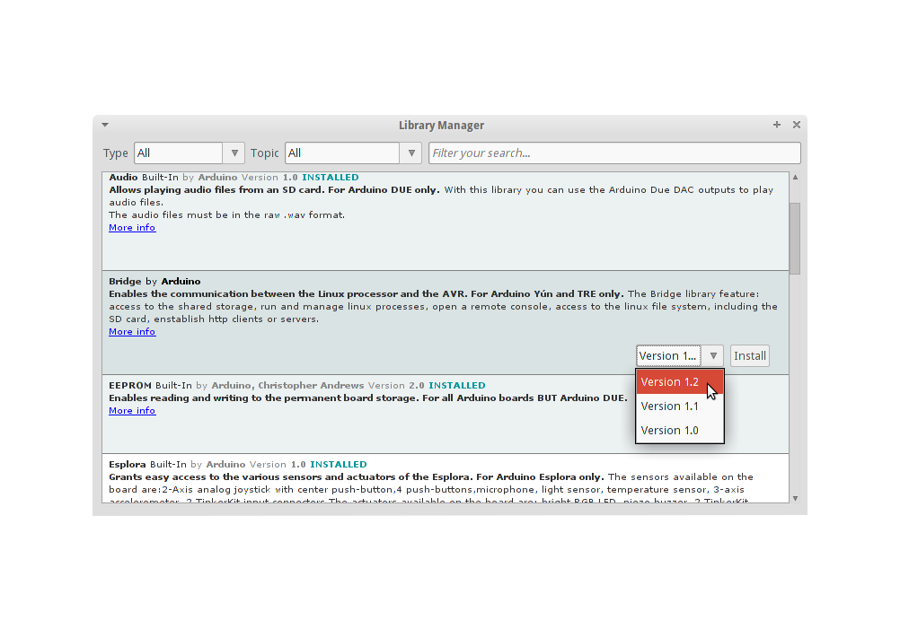
Then the library manager will open and you will find a list of libraries that are already installed or ready for installation. In this example we will install the Bridge library. Scroll the list to find it, then select the version of the library you want to install. Sometimes only one version of the library is available. If the version selection menu does not appear, don’t worry: it is normal.
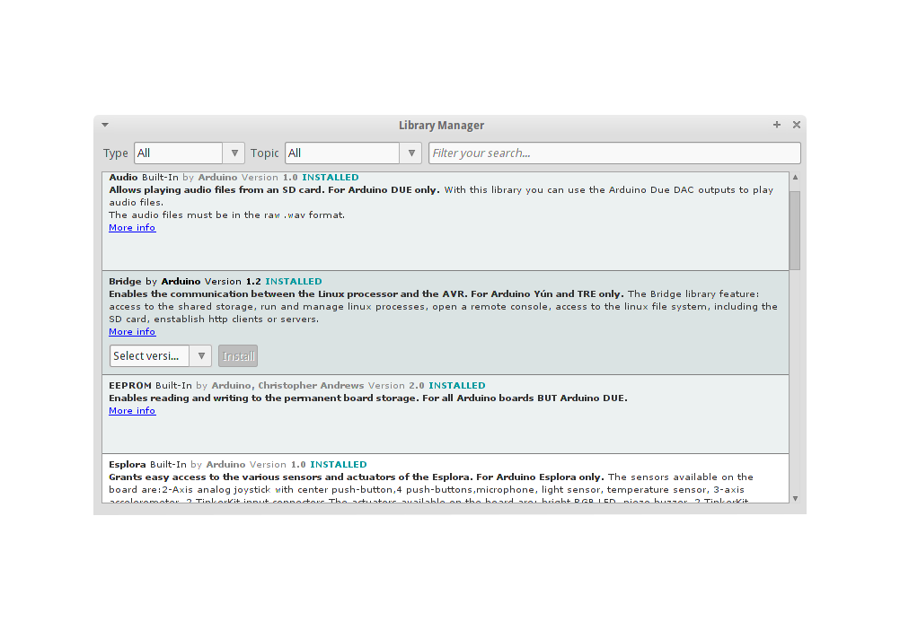
Finally click on install and wait for the IDE to install the new library. Downloading may take time depending on your connection speed. Once it has finished, an Installed tag should appear next to the Bridge library. You can close the library manager.
You can now find the new library available in the Include Library menu. If you want to add your own library open a new issue on .

Importing a .zip Library

Libraries are often distributed as a ZIP file or folder. The name of the folder is the name of the library. Inside the folder will be a .cpp file, a .h file and often a keywords.txt file, examples folder, and other files required by the library. Starting with version 1.0.5, you can install 3rd party libraries in the IDE. Do not unzip the downloaded library, leave it as is.

In the Arduino IDE, navigate to Sketch > Include Library. At the top of the drop down list, select the option to “Add .ZIP Library”.
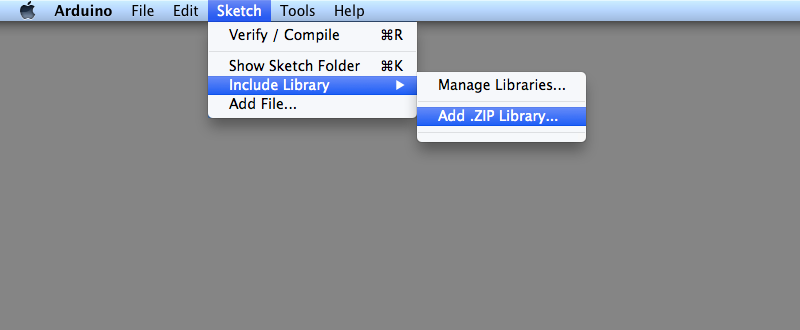
You will be prompted to select the library you would like to add. Navigate to the .zip file’s location and open it.
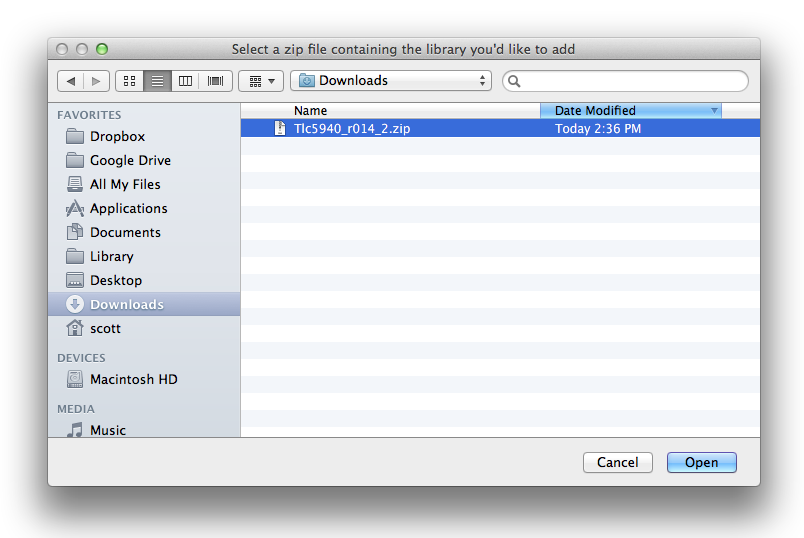
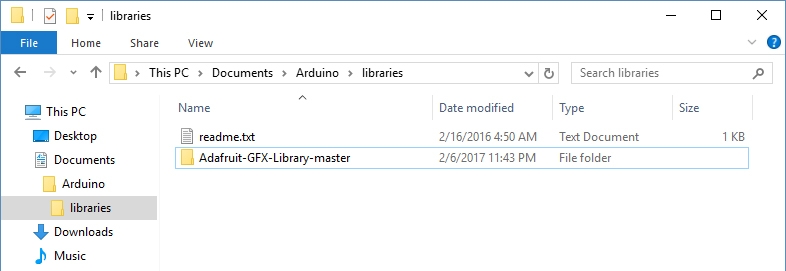
Return to the Sketch > Import Library menu. You should now see the library at the bottom of the drop-down menu. It is ready to be used in your sketch. The zip file will have been expanded in the libraries folder in your Arduino sketches directory.

NB: the Library will be available to use in sketches, but examples for the library will not be exposed in the File > Examplesuntil after the IDE has restarted.

Manual installation

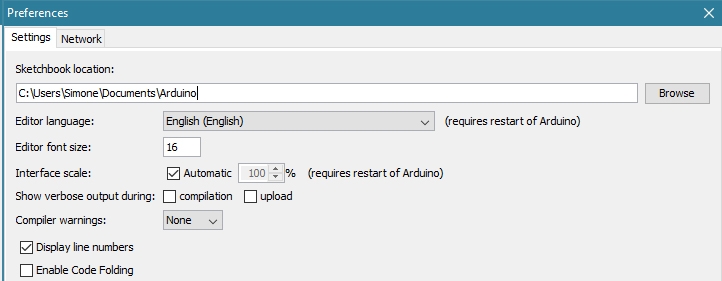
When you want to add a library manually, you need to download it as a ZIP file, expand it and put in the proper directory. The ZIP file contains all you need, including usage examples if the author has provided them. The library manager is designed to install this ZIP file automatically as explained in the former chapter, but there are cases where you may want to perform the installation process manually and put the library in the libraries folder of your sketchbook by yourself. Arduino libraries are managed in three different places: inside the IDE installation folder, inside the core folder and in the libraries folder inside your sketchbook. The location of your sketchbook defaults to “..\\DOCUMENTS\Arduino” on Windows machines. The path is clearly shown in the Preferences panel. If you want to see where the sketchbook defaults open Preferences under File.
Go to the directory where you have downloaded the ZIP file of the library

Please note: the way libraries are chosen during compilation is designed to allow the update of libraries present in the distribution. This means that placing a library in the “libraries” folder in your sketchbook overrides the other libraries versions. The same happens for the libraries present in additional cores installations. It is also important to note that the version of the library you put in your sketchbook may be lower than the one in the distribution or core folders, nevertheless it will be the one used during compilation. When you select a specific core for your board, the libraries present in the core’s folder are used instead of the same libraries present in the IDE distribution folder. Last, but not least important is the way the Arduino Software (IDE) upgrades itself: all the files in Programs/Arduino (or the folder where you installed the IDE) are deleted and a new folder is created with fresh content. This is why we assume that your libraries are properly put in your sketchbook folder and therefore they are not deleted during the Arduino Software (IDE) update process.

This tutorial based on text by Limor Fried. Last revision 2017/02/07 by SM

Extract the ZIP file with all its folder structure in a temporary folder, then select the main folder, that should have the library name

Copy it in the “libraries” folder inside your sketchbook.
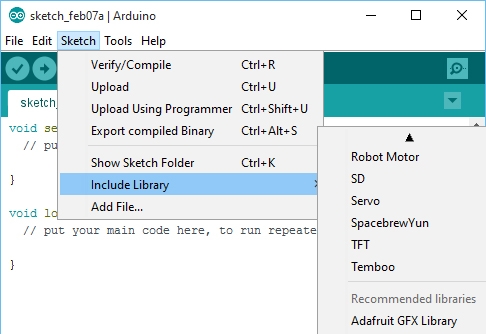
Start the Arduino Software (IDE), goto Sketch and the Include Library. Verify that the library you just added is available in the list, after the core libs.
The text of the Arduino getting started guide is licensed under a . Code samples in the guide are released into the public domain.This paper is from https://www.arduino.cc/en/Guide/Libraries

Creative Commons Attribution-ShareAlike 3.0 License
github